
首先创建package.json文件
#初始化
npm init
This utility will walk you through creating a package.json file.
It only covers the most common items, and tries to guess sensible defaults.

See `npm help init` for definitive documentation on these fields
and exactly what they do.

Use `npm install <pkg>` afterwards to install a package and
save it as a dependency in the package.json file.

Press ^C at any time to quit.
package name: (魈)
Sorry, name can only contain URL-friendly characters.
package name: (魈) xiaoyang
version: (1.0.0)
description: 给小羊写的魈魈页面
entry point: (index.js)
test command: http-server
git repository:
keywords:
author: xiaohei6856
About to write to C:\Users\xiaohei\Desktop\魈\package.json:

{
  "name": "xiaoyang",
  "description": "给小羊写的魈魈页面",
  "main": "index.js",
  "scripts": {
    "test": "http-server"
  "author": "xiaohei6856",
  "license": "ISC"
}


Is this OK? (yes) yes
既然都有package.json文件了,当然要可以通过脚本运行起来吧。
这个时候就需要http-server这个工具了(当然你也可以直接双击html文件,这样也行)
-
全局安装
http-server:打开终端,并运行以下命令来全局安装
http-server:
#全局安装http-server
npm install -g http-server
这将在全局范围内安装 `http-server`,使其在任何地方都可以使用。
-
在 HTML 文件所在的目录运行
http-server:进入包含你的 HTML 文件的目录,然后运行以下命令:
http-server
这将启动一个本地服务器,并显示可访问该 HTML 文件的 URL。
-
在浏览器中打开 URL:
复制
http-server启动时显示的 URL(通常是http://localhost:8080或类似的地址),然后在浏览器中打开该 URL。
这样,你就可以通过本地服务器运行你的 HTML 文件了。这只是一种方法,你也可以使用其他类似的工具,比如 live-server 或 serve。确保在运行这些命令之前,你已经安装了 Node.js 和 npm。
但是运行完发现不会自动打开运行的页面,嗯...
这个时候就要用到自带的start命令了
如果你想在启动命令中使用不同的浏览器,可以根据浏览器的可执行文件名来调整命令。以下是针对 Edge 和 Firefox 的例子:
- Edge(Microsoft Edge):
"scripts": {
  "start-server": "http-server",
  "open-edge": "start microsoft-edge:http://localhost:8080",
  "serve": "npm run start-server & npm run open-edge"
}
在上述例子中,`start microsoft-edge:` 后面的 URL 是你想要打开的地址。
- Firefox:
"scripts": {
  "start-server": "http-server",
  "open-firefox": "start firefox http://localhost:8080",
  "serve": "npm run start-server & npm run open-firefox"
}
在上述例子中,`start firefox` 后面的 URL 是你想要打开的地址。
- Chrome:
"scripts": {
  "start-server": "http-server",
  "open-chrome": "start firefox http://localhost:8080",
  "serve": "npm run start-server & npm run open-chrome"
}
在上述例子中,`start firefox` 后面的 URL 是你想要打开的地址。
在这两个例子中,start 是 Windows 系统下的命令。如果你在其他操作系统上工作,你可能需要调整启动命令。在 Unix-like 系统上(如 Linux 和 macOS),你可以使用 open 命令,例如:
"open-firefox": "open -a Firefox http://localhost:8080"
请根据你的操作系统和浏览器选择适当的命令。在这些示例中,open 和 start 是用于打开默认浏览器的命令。
但是这个时候,你又会遇到一个问题,就是页面确实运行起来的,但是还是没有打开,这是因为,页面的运行是个持续的动作导致阻塞了,这时候就要这样了。
首先,你需要确保你已经安装了 npm-run-all 或者 concurrently。你可以在项目中运行以下命令进行安装:(这个我试过了,可以)
npm install -D npm-run-all
或者
npm install -D concurrently
然后,你可以更新你的 package.json 文件中的脚本部分:
"scripts": {
  "start-server": "http-server",
  "open-browser": "start microsoft-edge:http://localhost:8080",
  "serve": "npm-run-all -p start-server open-browser"
}
或者,如果你使用 concurrently:
"scripts": {
  "start-server": "http-server",
  "open-browser": "start http://localhost:8080",
  "serve": "concurrently \"npm run start-server\" \"npm run open-browser\""
}
上述更改将确保 start-server 和 open-browser 在并行执行时正常工作,无论你使用的是 Windows、Linux 还是 macOS。
接下来你就可以按照官网给的tailwind Cli的方式进行安装和使用了。
安装 - TailwindCSS中文文档 | TailwindCSS中文网
-
安装 Tailwind CSS
通过 npm 安装
tailwindcss,然后创建你自己的 create yourtailwind.config.js配置文件。
npm install -D tailwindcssnpx tailwindcss init
-
配置模板文件的路径
在
tailwind.config.js配置文件中添加所有模板文件的路径。
//tailwind.config.js
/** @type {import('tailwindcss').Config} */

module.exports = {

  content: ['./*.{html,js}'],

  theme: {

    extend: {},

  },

  plugins: [],

}
-
将加载 Tailwind 的指令添加到你的 CSS 文件中
在你的主 CSS 文件中通过
@tailwind指令添加每一个 Tailwind 功能模块。
/*  base.css  */
@tailwind base;

@tailwind components;

@tailwind utilities;
-
开启 Tailwind CLI 构建流程
运行命令行(CLI)工具扫描模板文件中的所有出现的 CSS 类(class)并编译 CSS 代码。
npx tailwindcss -i ./base.css -o ./index.css --watch
-
在你的 HTML 代码中使用 Tailwind 吧
在
<head>标签内引入编译好的 CSS 文件,然后就可以开始使用 Tailwind 的工具类 来为你的内容设置样式了。
<!doctype html>

  <html>

  <head>

    <meta charset="UTF-8">

    <meta name="viewport" content="width=device-width, initial-scale=1.0">

    <link href="index.css" rel="stylesheet">

  </head>

  <body>

    <h1 class="text-3xl font-bold underline">

      Hello world!

    </h1>

  </body>

  </html>
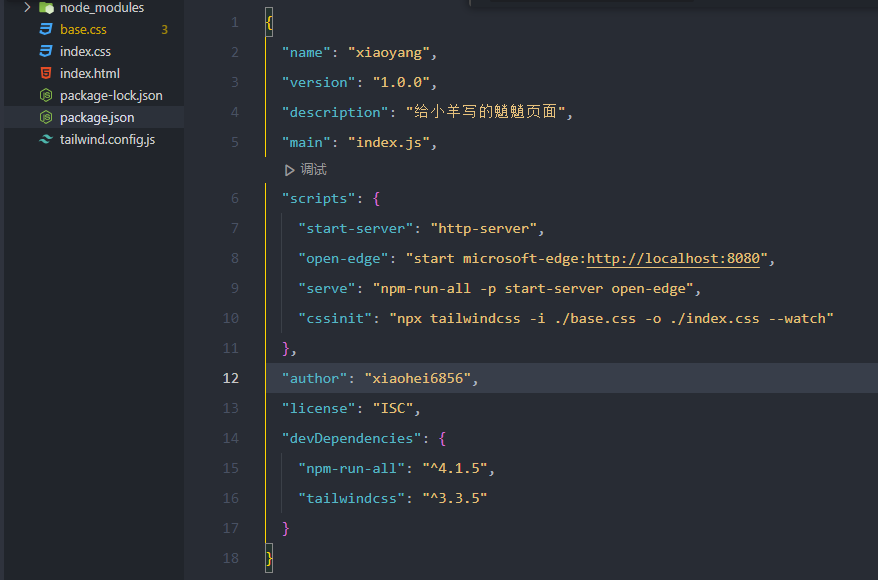
这样就配置好了,下面放一下我的配置文件和目录结构
package.json
{
  "name": "xiaoyang",
  "version": "1.0.0",
  "description": "给小羊写的魈魈页面",
  "main": "index.js",
  "scripts": {
    "start-server": "http-server",
    "open-edge": "start microsoft-edge:http://localhost:8080",
    "serve": "npm-run-all -p start-server open-edge",
    "cssinit": "npx tailwindcss -i ./base.css -o ./index.css --watch"
  },
  "author": "xiaohei6856",
  "license": "ISC",
  "devDependencies": {
    "npm-run-all": "^4.1.5",
    "tailwindcss": "^3.3.5"
  }
}
npm run serve
#跑起来啦!当然没有保存刷新,要用保存刷新的话还要另外做配置,我这里就不写了,我觉得不如不用,啊哈哈哈。
npm run cssinit
#这个是将tailwind样式打包出来,可以放服务器,嗯.